Tracking technical initiatives with Backstage.io
In this article, we’re going to cover using the developer portal or service catalogue Backstage.io to track technical initiatives as they’re rolled out across a business.
Why use a tool like Backstage.io for this?
Change in technical ways of working is inevitable, but tracking progress manually with a spreadsheet or document requires a lot of error-prone and tedious effort by a human. As the driver or responsible person for these initiatives, we might miss a service/project that needs to change, and could end up as the sole person who’s updating the tracker. A service catalogue like Backstage.io lets teams self-serve this information, including using APIs to consume it programmatically and to trigger automation if they wish. Anchoring change around Backstage helps bake the tool into the day-to-day work that teams perform, including encouraging them to clearly describe and document the services they produce.
What are our aims of building this automation?
Here are some example goals we might have when deploying this solution:
-
Developers and tech leads can self-serve information about their own services to track their progress in rolling out technical initiatives or change.
- They can update their solutions with the new ways of working and see their projects automatically marked as compliant / updated, without any interaction with a person or team.
-
Central governance functions like an architecture team, engineering managers and platform teams can view the progress over all services, including finding the responsible party for any given service/project.
-
Encouraging more regular use of Backstage improves the discoverability and documentation of all services. Teams begin to use it as a place to find information and service owners in response to alerts/notifications.
What kind of technical initiatives could we track this way?
-
Deprecations of application runtimes, e.g. NodeJS 16 becoming end-of-life.
-
The adoption of a new CI/CD tool.
-
The adoption of CI/CD components, i.e.: custom GitHub Actions, templates or standardised Docker base images.
-
A change in Infrastructure as Code (IaC) tool, for example moving from AWS’ CDK to Terraform.
What does Backstage give us out of the box?
I’d categorise Backstage as an open-source project that you fork and customise, as opposed to a turn-key solution that’s ready to work for your use case. We’ll be using the GitHub integration to discover users, groups and repos in our organization, and then we’ll enrich and add to this data.
The customisability is a double-edged sword: it may act as a ‘hook’ where a platform team or interested individuals can build interesting functionality, but there’s a decent learning curve and plenty to build to harden the default offering.
Let’s build!
The final solution discussed here is provided as proof-of-concept quality code in this GitHub repo. I’d suggest that you use that as a baseline rather than try and recreate it step-by-step with the following instructions.
We’ll start off by creating a new Backstage project:
npx @backstage/create-app@latest
With that out the way, it’s easy to get started and to view your service catalogue:
cd my-backstage-app
yarn dev # will open a browser
Let’s start by giving our service catalogue a nicer name:
diff --git a/app-config.yaml b/app-config.yaml
index 08d2abf..bb7ee71 100644
--- a/app-config.yaml
+++ b/app-config.yaml
@@ -1,9 +1,9 @@
 app:
-  title: Scaffolded Backstage App
+  title: Shersoft Service Catalogue
   baseUrl: http://localhost:3000

 organization:
-  name: My Company
+  name: Shersoft Ltd
We’ll use a Postgres database to store our Backstage data. Create a Docker
compose config file for testing in development (docker-compose.yml):
version: '3.8'

services:
  postgres:
    image: postgres:16
    environment:
      POSTGRES_DB: service_catalogue
      POSTGRES_USER: service_catalogue
      POSTGRES_PASSWORD: service_catalogue
    ports:
      - 5432:5432
After a quick docker compose up, we can tell Backstage to use our database
rather than the default one that’s run in-memory:
diff --git a/app-config.yaml b/app-config.yaml
index 08d2abf..bb7ee71 100644
--- a/app-config.yaml
+++ b/app-config.yaml
@@ -18,38 +18,46 @@ backend:
     # Uncomment the following host directive to bind to specific interfaces
     # host: 127.0.0.1
   csp:
-    connect-src: ["'self'", 'http:', 'https:']
+    connect-src: [ "'self'", 'http:', 'https:' ]
     # Content-Security-Policy directives follow the Helmet format: https://helmetjs.github.io/#reference
     # Default Helmet Content-Security-Policy values can be removed by setting the key to false
   cors:
     origin: http://localhost:3000
-    methods: [GET, HEAD, PATCH, POST, PUT, DELETE]
+    methods: [ GET, HEAD, PATCH, POST, PUT, DELETE ]
     credentials: true
   # This is for local development only, it is not recommended to use this in production
   # The production database configuration is stored in app-config.production.yaml
   database:
-    client: better-sqlite3
-    connection: ':memory:'
+    client: pg
+    connection:
+      host: localhost
+      user: service_catalogue
+      password: service_catalogue
+      port: 5432
+    plugin:
+      auth:
+        connection:
+          database: service_catalogue
   # workingDirectory: /tmp # Use this to configure a working directory for the scaffolder, defaults to the OS temp-dir
Next, create a GitHub Application in your GitHub organization that has at least the following permissions:
- Read access to commit statuses, members, and metadata
- Read access to actions, code, and pull requests
We’ll use environment variables to pass in the required data. I’m using an
IntelliJ-based editor which makes this easy to do in a run configuration, but
you may wish to adopt a library like dotenv if your editor doesn’t make this
easy.
If you need help setting up the GitHub Application, check out GitHub Apps in their docs.
Update the integration in your app-config.yaml:
backend:
  integrations:
    github:
      apps:
        - appId: ${AUTH_GITHUB_APP_ID}
          webhookUrl: ${AUTH_GITHUB_WEBHOOK_URL}
          clientId: ${AUTH_GITHUB_CLIENT_ID}
          clientSecret: ${AUTH_GITHUB_CLIENT_SECRET}
          webhookSecret: ${AUTH_GITHUB_WEBHOOK_SECRET}
          privateKey: ${AUTH_GITHUB_PRIVATE_KEY}
While we’re at it, we can use the same GitHub App to authenticate users with Backstage:
backend:
  auth:
    providers:
      github:
        development:
          clientId: ${AUTH_GITHUB_CLIENT_ID}
          clientSecret: ${AUTH_GITHUB_CLIENT_SECRET}

    # Please, please, change this to a randomly generated secret in an env var!
    session:
      secret: test123
NB: This is where we run into a small but unfriendly footgun - as what Backstage would call the “integrators”, it’s our job to ensure that auth(n|z) actually happens. Even though we’ve configured authentication above, all API endpoints are still open to whoever can reach them. Do not host your Backstage instance on the internet!
Let’s add some form of protection to the endpoints by verifying the user:
diff --git a/packages/backend/src/index.ts b/packages/backend/src/index.ts
index 04c4ff9..06534ac 100644
--- a/packages/backend/src/index.ts
+++ b/packages/backend/src/index.ts
@@ -30,7 +30,12 @@ import techdocs from './plugins/techdocs';
 import search from './plugins/search';
 import { PluginEnvironment } from './types';
 import { ServerPermissionClient } from '@backstage/plugin-permission-node';
-import { DefaultIdentityClient } from '@backstage/plugin-auth-node';
+import {
+  DefaultIdentityClient,
+  IdentityApi,
+} from '@backstage/plugin-auth-node';
+import { Request, Response, NextFunction } from 'express';
+import { Logger } from 'winston';

 function makeCreateEnv(config: Config) {
   const root = getRootLogger();
@@ -71,6 +76,51 @@ function makeCreateEnv(config: Config) {
   };
 }

+function buildAuthMiddleware(identity: IdentityApi, logger: Logger) {
+  return function authMiddleware(
+    req: Request,
+    res: Response,
+    next: NextFunction,
+  ) {
+    if (req.originalUrl.startsWith('/api/auth')) {
+      return next();
+    }
+
+    if (req.ip === '127.0.0.1' || req.ip === '::1') {
+      if (logger.isLevelEnabled('debug')) {
+        logger.debug('loopback request - allowing');
+      }
+
+      return next();
+    }
+
+    identity
+      .getIdentity({ request: req })
+      .then(result => {
+        if (result?.identity) {
+          if (logger.isLevelEnabled('info')) {
+            logger.info('user is authenticated', {
+              identity: result.identity,
+            });
+          }
+
+          next();
+        } else {
+          if (logger.isLevelEnabled('info')) {
+            logger.info('user is not authenticated');
+          }
+
+          res.status(401);
+          res.json({ error: 'Unauthorized.' });
+        }
+      })
+      .catch(err => {
+        logger.warn('failed to authenticate user', { err });
+        next();
+      });
+  };
+}
+
 async function main() {
   const config = await loadBackendConfig({
     argv: process.argv,
@@ -86,7 +136,10 @@ async function main() {
   const searchEnv = useHotMemoize(module, () => createEnv('search'));
   const appEnv = useHotMemoize(module, () => createEnv('app'));

+  const identity = createEnv('auth').identity;
+
   const apiRouter = Router();
+  apiRouter.use(buildAuthMiddleware(identity, appEnv.logger));
   apiRouter.use('/catalog', await catalog(catalogEnv));
   apiRouter.use('/scaffolder', await scaffolder(scaffolderEnv));
   apiRouter.use('/auth', await auth(authEnv));
OK - back to the GitHub setup. In app-config.yaml, we’re going to add the
GitHub provider:
catalog:
  providers:
    github:
      # the provider ID can be any camelCase string
      shersoftLtdGitHub:
        organization: 'shersoft-ltd' # string
        catalogPath: '/catalog-info.yaml' # string
        filters:
          branch: 'main' # string
          repository: '.*' # Regex
Change the provider ID and organization name to fit your context.
We’ll also want to use the Postgres database to hold our search-engine data:
diff --git a/packages/backend/src/plugins/search.ts b/packages/backend/src/plugins/search.ts
index 467ac60..c980f52 100644
--- a/packages/backend/src/plugins/search.ts
+++ b/packages/backend/src/plugins/search.ts
@@ -8,14 +8,17 @@ import { PluginEnvironment } from '../types';
 import { DefaultCatalogCollatorFactory } from '@backstage/plugin-search-backend-module-catalog';
 import { DefaultTechDocsCollatorFactory } from '@backstage/plugin-search-backend-module-techdocs';
 import { Router } from 'express';
+import { PgSearchEngine } from '@backstage/plugin-search-backend-module-pg';

 export default async function createPlugin(
   env: PluginEnvironment,
 ): Promise<Router> {
   // Initialize a connection to a search engine.
-  const searchEngine = new LunrSearchEngine({
+  const searchEngine = await PgSearchEngine.fromConfig(env.config, {
+    database: env.database,
     logger: env.logger,
   });
+
   const indexBuilder = new IndexBuilder({
     logger: env.logger,
     searchEngine,
The last step will be adding a GitHub sign-in button to the frontend:
diff --git a/packages/app/src/App.tsx b/packages/app/src/App.tsx
index 8d62f29..880b4e4 100644
--- a/packages/app/src/App.tsx
+++ b/packages/app/src/App.tsx
@@ -27,12 +27,17 @@ import { entityPage } from './components/catalog/EntityPage';
 import { searchPage } from './components/search/SearchPage';
 import { Root } from './components/Root';

-import { AlertDisplay, OAuthRequestDialog } from '@backstage/core-components';
+import {
+  AlertDisplay,
+  OAuthRequestDialog,
+  SignInPage,
+} from '@backstage/core-components';
 import { createApp } from '@backstage/app-defaults';
 import { AppRouter, FlatRoutes } from '@backstage/core-app-api';
 import { CatalogGraphPage } from '@backstage/plugin-catalog-graph';
 import { RequirePermission } from '@backstage/plugin-permission-react';
 import { catalogEntityCreatePermission } from '@backstage/plugin-catalog-common/alpha';
+import { githubAuthApiRef } from '@backstage/core-plugin-api';

 const app = createApp({
   apis,
@@ -53,6 +58,20 @@ const app = createApp({
       catalogIndex: catalogPlugin.routes.catalogIndex,
     });
   },
+  components: {
+    SignInPage: props => (
+      <SignInPage
+        {...props}
+        auto
+        provider={{
+          id: 'github-auth-provider',
+          title: 'GitHub',
+          message: 'Sign in using GitHub',
+          apiRef: githubAuthApiRef,
+        }}
+      />
+    ),
+  },
 });

 const routes = (
OK, that’s the basics done! What next?
Discovering entities
Backstage tracks entities of various types. They could be things like our services, the infrastructure components that form them, or even the team of people that own them.
We’re going to demonstrate a use-case in which a technical leader wants to track which NodeJS runtimes are use in Lambda functions that have been created by CloudFormation projects. This could be used when a runtime version is nearing end-of-life, and we want to give teams an early nudge to upgrade.
Here’s what this will look like in the Backstage user-interface when it’s done:
In AWS, we’ll have Backstage assume a role to describe information about our organization, and then we’ll have it assume a role in each account to perform its discovery:
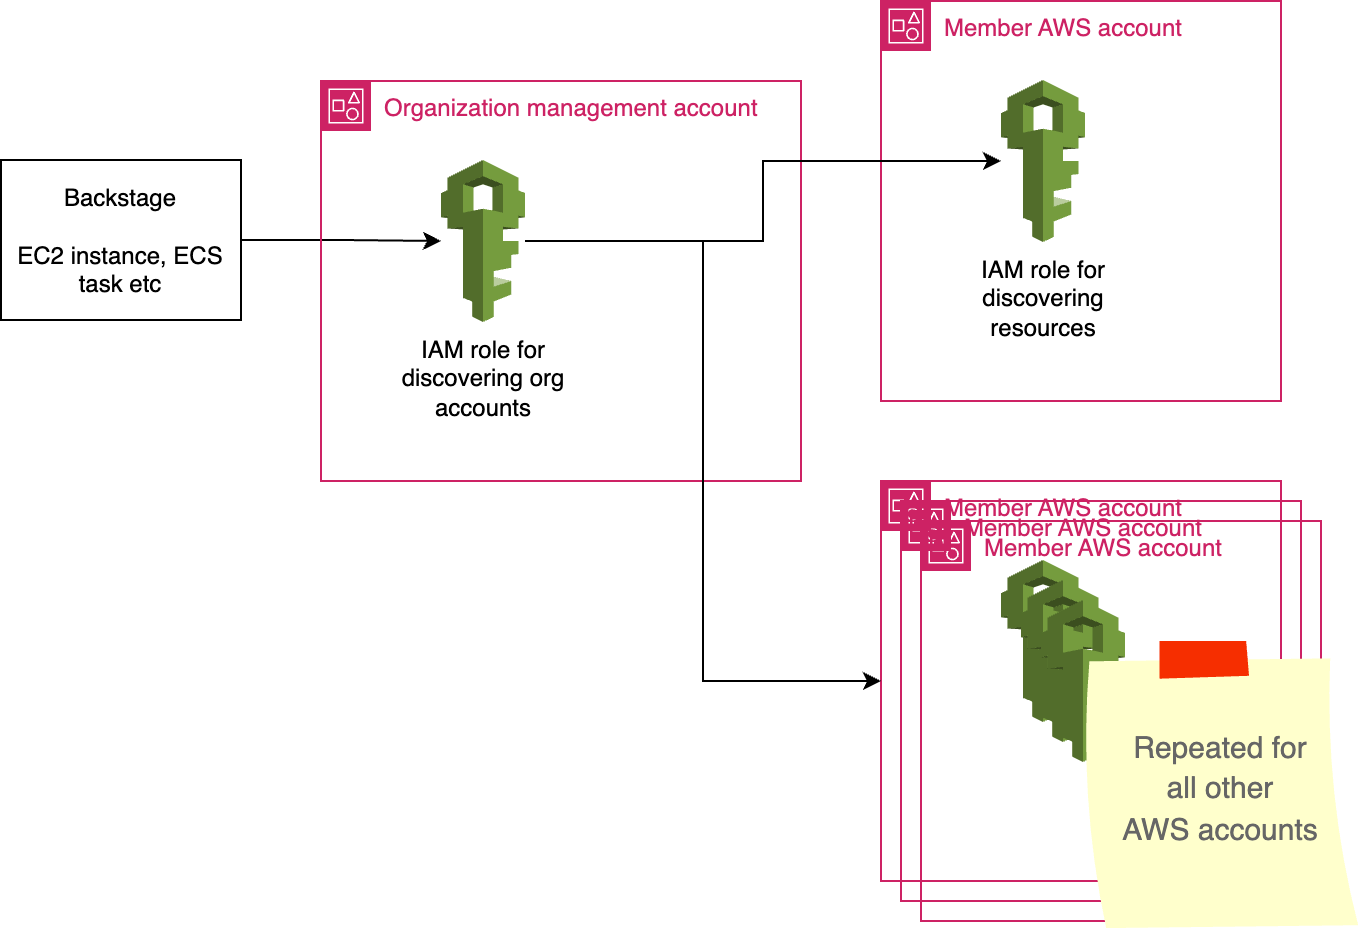
Inside Backstage, our discovery process will happen in two steps:
-
We’ll create an “Entity Provider” which will scan for CloudFormation Stacks in each account and produce a
Location.A
Locationis a resource that identifies something like a GitHub repo or a file containing some Backstage entities. -
We’ll create an “Entity Processor” which will read each of our
Locations to find the resources there and create further Backstage entities for them.
Building the entity provider
A quick reminder: all this code is available in this GitHub repo.
Our entity provider starts with a lot of glue code that’s not very interesting, but it’s initialised as follows:
new TechMaturityEntityProvider(
  // A Winston-based logger
  options.logger,

  // The CRON schedule for how often we scrape AWS
  options.schedule,

  // The AWS region(s) we're interested in
  regions,

  // AWS SDK v3 for NodeJS - client used to list accounts in the org
  new OrganizationsClient({
    credentials: topLevelCredentials,
  }),

  // The role name we'll form into an ARN for each account
  destinationRoleName,
)
The topLevelCredentials are derived from a role that Backstage will assume to
read organization data. We do this to allow Backstage to live outside the org
management account. Here’s a quick tip, use fromTemporaryCredentials to avoid
having to manually assume a role and feed the credentials back into the AWS
SDK:
import { fromTemporaryCredentials } from '@aws-sdk/credential-providers';

const topLevelCredentials = fromTemporaryCredentials({
  params: {
    RoleArn: sourceRoleArn,
  },
})
OK - enough of the setup! Let’s head to the refresh method that Backstage
will call on our chosen schedule. We begin by listing all AWS accounts using
the built-in pagination utilities:
const listAccounts = paginateListAccounts(
  { client: this.organizationsClient },
  {},
);
const accounts: Account[] = [];

for await (const result of listAccounts) {
  result.Accounts?.forEach(account => accounts.push(account));
}

this.logger.info('loaded AWS accounts from the organization', {
  numAccounts: accounts.length,
});
With that done, we scrape each account for all of its CloudFormation stacks:
const stacks: DeferredEntity[] = [];

await pMap(
  accounts,
  async account => {
    try {
      for (const region of this.regions) {
        const roleArn = `arn:aws:iam::${account.Id}:role/${this.destinationRoleName}`;

        const cloudFormationClient = new CloudFormationClient({
          credentials: fromTemporaryCredentials({
            masterCredentials: this.organizationsClient.config.credentials,
            params: {
              RoleArn: roleArn,
            },
          }),
          region,
        });

        const describeStacks = paginateDescribeStacks(
          { client: cloudFormationClient },
          {},
        );

        for await (const result of describeStacks) {
          for (const stack of result.Stacks || []) {
            if (!IN_SCOPE_STACK_STATUSES.includes(stack.StackStatus!)) {
              this.logger.debug(
                "not considering stack because it's not in a status we accept",
                { account, stack },
              );

              return;
            }

            stacks.push({
              locationKey: this.getProviderName(),
              entity: locationSpecToLocationEntity({
                location: {
                  type: TechMaturityEntityProvider.CloudFormationStackLocationType,
                  target: JSON.stringify({
                    accountId: account.Id,
                    roleArn: roleArn,
                    stackName: encodeURIComponent(stack.StackName!),
                    region,
                  }),
                },
              }),
            });

            this.logger.debug('discovered CloudFormation Stack', {
              account,
              stack,
            });
          }
        }
      }

      this.logger.info('processed AWS account', { account });
    } catch (err) {
      this.logger.warn('failed to detect resources in AWS account', {
        account,
        err,
      });
    }
  },
  { concurrency: 3 },
);
We’ll break the above code down into sections as this is a rather lengthy
method. If you’re using this code to form a production-grade service catalogue
solution, I think it could benefit from some refactoring! The same
fromTemporaryCredentials method is used again to chain together the role
we’ve assumed in the org management account and the role in each destination
account:
const roleArn = `arn:aws:iam::${account.Id}:role/${this.destinationRoleName}`;

const cloudFormationClient = new CloudFormationClient({
  credentials: fromTemporaryCredentials({
    masterCredentials: this.organizationsClient.config.credentials,
    params: {
      RoleArn: roleArn,
    },
  }),
  region,
});
The SDK client setup is followed by some boilerplate code to list all the CloudFormation stacks in the account and to ensure they’re in a suitable state:
const describeStacks = paginateDescribeStacks(
  { client: cloudFormationClient },
  {},
);

for await (const result of describeStacks) {
  for (const stack of result.Stacks || []) {
    if (!IN_SCOPE_STACK_STATUSES.includes(stack.StackStatus!)) {
      this.logger.debug(
        "not considering stack because it's not in a status we accept",
        { account, stack },
      );

      return;
    }

    // Create a location here

    this.logger.debug('discovered CloudFormation Stack', {
      account,
      stack,
    });
  }
}
For each stack, we build a Location entity ready to give to Backstage:
// This replaces the "Create a location here" comment above
stacks.push({
  locationKey: this.getProviderName(),
  entity: locationSpecToLocationEntity({
    location: {
      type: TechMaturityEntityProvider.CloudFormationStackLocationType,
      target: JSON.stringify({
        accountId: account.Id,
        roleArn: roleArn,
        stackName: encodeURIComponent(stack.StackName!),
        region,
      }),
    },
  }),
});
We’ll use the target parameter in our processor to identify the stack and
the account it’s located in.
When each account has been scraped, we’re left with a set of entities we can return to Backstage:
await this.connection?.applyMutation({
  type: 'full',
  entities: stacks,
});
The use of type: 'full' tells Backstage that it can discard the entities we
are no longer returning. And that’s it for the entity provider! Let’s move on
to the processor to see how those Location entities are turned into further
entities.
Building the entity processor
We can then build a class that implements CatalogProcessor. The method we’re
interested in is called readLocation, and will be called for every Location
entity registered to Backstage, even ones that we’re not interested in. We
start the readLocation method by filtering entities down to just ones that
we’ve made in our EntityProvider.
async function readLocation(
  location: LocationSpec,
  _optional: boolean,
  emit: CatalogProcessorEmit,
  _parser: CatalogProcessorParser,
  _cache: CatalogProcessorCache,
) {
  if (
    location.type !==
    TechMaturityEntityProvider.CloudFormationStackLocationType
  ) {
    return false;
  }

  // Do some stuff
}
We’ll start by reading the configuration we saved in the target field of the
Location, and we’ll use it to build an AWS SDK client:
const { accountId, roleArn, stackName, region } = JSON.parse(
  location.target,
);

const logger = this.logger.child({
  roleArn,
  stackName,
  accountId,
  region,
});

logger.info('reading location', {
  location,
});

const cloudFormationClient = new CloudFormationClient({
  credentials: fromTemporaryCredentials({
    masterCredentials: this.topLevelCredentials,
    params: {
      RoleArn: roleArn,
    },
  }),
});
With a client authenticated in our destination account, we can read the resources and template of the stack:
const stack = await cloudFormationClient.send(
  new DescribeStacksCommand({ StackName: stackName }),
);

if (!stack.Stacks?.[0]?.StackStatus?.includes('COMPLETE')) {
  logger.info("not reading stack as it's not in a supported state", {
    status: stack.Stacks?.[0]?.StackStatus,
  });

  return true;
}

const template = await cloudFormationClient.send(
  new GetTemplateCommand({
    StackName: stackName,
  }),
);

if (!template.TemplateBody) {
  throw new Error(
    `CloudFormation stack ${stackName} (account = ${accountId}, region = ${region}) missing template body.`,
  );
}
Backstage entities must have unique names, and we’re quite constrained by the characters we can use and how many we’re allowed. We’ll hash together parts of the CloudFormation stack’s identifiers to form a string that’s no more than 63 characters long:
const stackResourceName =
  'aws-cfn-' +
  crypto
    .createHash('shake256', { outputLength: 27 })
    .update(Buffer.from(stack.Stacks![0]!.StackId!, 'utf-8'))
    .digest()
    .toString('hex');
With that done, we’ve got a fairly lengthy bit of code to build a Backstage
entity that describes our CloudFormation stack, including linking it to the
Location:
emit(
  processingResult.entity(location, {
    apiVersion: 'backstage.io/v1alpha1',
    kind: 'Resource',
    metadata: {
      // Use the name we generated based on a hash above
      name: stackResourceName,

      description: `Auto-detected AWS CloudFormation Stack: ${stackName}`,

      // Annotations can be longer, so store information about the stack here
      annotations: {
        [`${TechMaturityCatalogProcessor.AnnotationPrefix}region`]:
          region,
        [`${TechMaturityCatalogProcessor.AnnotationPrefix}lookedUpWith`]:
          roleArn,
        [`${TechMaturityCatalogProcessor.AnnotationPrefix}accountId`]:
          accountId,
        [`${TechMaturityCatalogProcessor.AnnotationPrefix}cloudFormationStackName`]:
          stackName,
      },

      // Give users in the UI an easy way to get to the stack
      links: [
        {
          url: `https://${region}.console.aws.amazon.com/cloudformation/home?region=${region}#/stacks/stackinfo?filteringText=&filteringStatus=active&viewNested=true&stackId=${encodeURIComponent(
            stack.Stacks![0].StackId!,
          )}`,
          title: 'CloudFormation stack in the AWS console',
        },
      ],
    },
    spec: {
      type: 'aws-cloudformation-stack',

      // We need to provide these fields, so base them from stack tags
      lifecycle: tags['shersoft-ltd:backstage:lifecycle'] || 'production',
      owner: tags['shersoft-ltd:backstage:owner'] || 'platform',
      dependencyOf: tags['shersoft-ltd:backstage:project']
        ? tags['shersoft-ltd:backstage:project']
        : [],
    },
  }),
);
The final step is to create an entity for each Lambda function that’s part of the CloudFormation stack, and to ensure it has a relationship with the stack:
emit(
  processingResult.entity(location, {
    apiVersion: 'backstage.io/v1alpha1',
    kind: 'Resource',
    metadata: {
      name: lambdaResourceName,
      description: `Auto-detected AWS Lambda function: ${resource.PhysicalResourceId}`,
      annotations: {
        [`${TechMaturityCatalogProcessor.AnnotationPrefix}region`]:
          region,
        [`${TechMaturityCatalogProcessor.AnnotationPrefix}lookedUpWith`]:
          roleArn,
        [`${TechMaturityCatalogProcessor.AnnotationPrefix}accountId`]:
          accountId,
        [`${TechMaturityCatalogProcessor.AnnotationPrefix}functionName`]:
          resource.PhysicalResourceId!,
        [`${TechMaturityCatalogProcessor.AnnotationPrefix}cloudFormationStackName`]:
          stackName,
        [`${TechMaturityCatalogProcessor.AnnotationPrefix}cloudFormationLogicalId`]:
          resource.LogicalResourceId!,
      },
      links: [
        {
          url: `https://${region}.console.aws.amazon.com/cloudformation/home?region=${region}#/stacks/stackinfo?filteringText=&filteringStatus=active&viewNested=true&stackId=${encodeURIComponent(
            stack.Stacks![0].StackId!,
          )}`,
          title: 'CloudFormation stack in the AWS console',
        },
      ],
    },
    spec: {
      type: 'aws-lambda-function',
      lifecycle:
        tags['shersoft-ltd:backstage:lifecycle'] || 'production',
      owner: tags['shersoft-ltd:backstage:owner'] || 'platform',
      dependencyOf: [
        ...(tags['shersoft-ltd:backstage:project']
          ? tags['shersoft-ltd:backstage:project']
          : []),
        // Create a relationship between this function and the stack
        `resource:${stackResourceName}`,
      ],

      // Here's where we link it to the Lambda runtime
      dependsOn: [
        `resource:aws-lambda-runtime-${resourceDetail.Properties.Runtime}`,
      ],
    },
  }),
);
There’s plenty more code to arrive at that entity, but it’s not very exciting, and you can always read it in this GitHub repo.
Conclusion
We can create custom EntityProviders and use them to scrape infrastructure or
services that exist in our environment. We can process entities by making our
own CatalogProcessor, including doing further processing of entities that we
didn’t initially discover. For example, we could check if a GitHub project has
a CI template we’re rolling out, and link it up to a Backstage Resource that
represents it.
Creating relationships between resources in Backstage lets us understand how components are consumed and, importantly, lets us track how they evolve over time.
Learning AWS' CDK in TypeScript? Check out my course on Udemy.